Wednesday, August 14, 2013

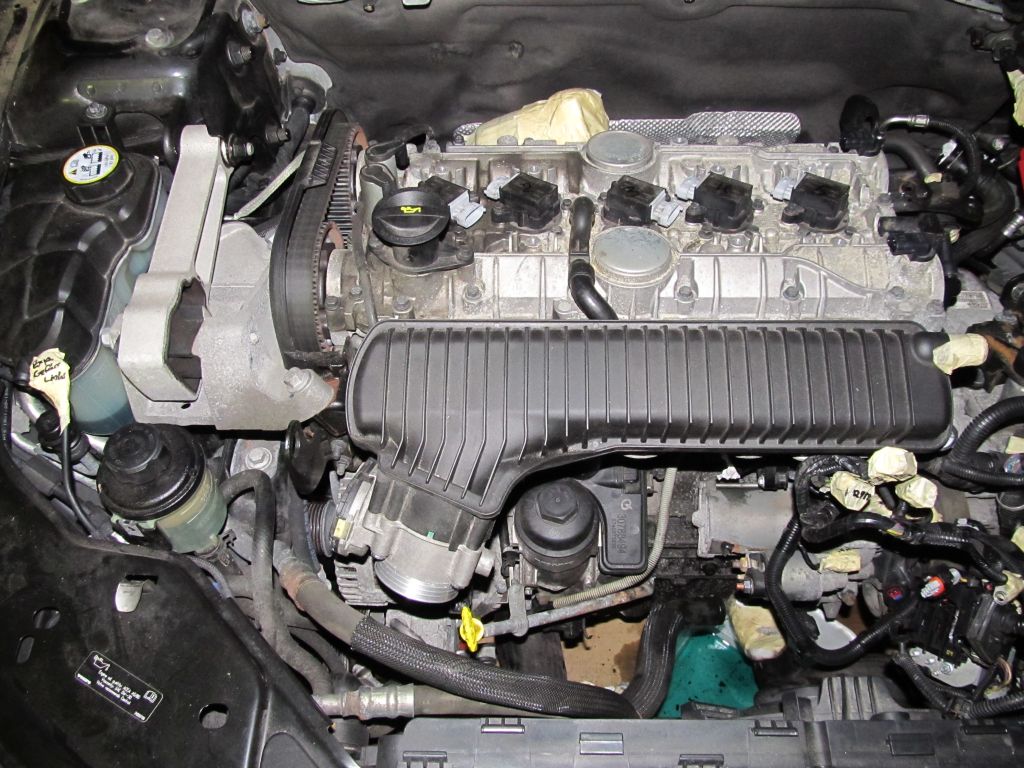
The ICE age is over...

After about 5 evenings/nights (5x 4-5h) spent in solitude with the S80 I convinced her (and myself) that it's about time to pull the tooth that was already loose for several weeks:
  • The coolant and the transmission oil was removed
  • The engine cable tree had to go out
  • All tubes were removed, incl. the hydraulic line of the clutch
  • Gear shifter was removed from transmission
  • Gas lines removed
  • Gas tank was removed - that was an adventure in itself

Gas tank
The tank was held in place by two brackets. At 23:00 in the night no one could be called for support, so I had to do it on my own or wait. Well, who am I to give up at 23:00 already? So, first remove the left bracket and then hold the tank in place with one hand. There were still about 8 Liters of gasoline in it. By lowering the lift a bit, I was able to use not only one hand to support the tank but also my head. Knowing that there might be some wires and tubes still attached on the upper side of the tank and that I won't be able to go to the workbench to get some tools, I stuffed all I could possibly need into my pant pockets beforehand: several sizes of screwdrivers, knife, pliers. While still holding the tank in place, I removed the second bracket. As soon as it was gone, a hideous balancing act started with the gasoline wavering around, continuously shifting the center of gravity. By various acts of gravity defiance, I managed to remove 2 plugs and one tube and then the tank was free.

Engine
A friendly shop owner in our little town lent me his motor lift. The removal went fairly well. The motor got stuck one time because the transmission hung a bit low. The lift didn't go as high as it should have. So alike to the gas tank removal, I had to use two hands to lift the sagging transmission high enough to get it over the front of the car and one foot to get the motor lift moving backwards. Looked and felt criminal but it worked :)

Transmission
Removing the transmission from the engine was a quick jobs: 10 screws, a few strong pulls and it was separated. But looking at the service manual on how to remove the clutch was a bit a downer. Because it's a self-adjusting clutch you have to use a special tool to relieve the tension of the springs to remove it from the engine and mount it again. Well, just another obstacle. I'd appreciate any hint on where to get this (and keep it for several weeks)
I'm already giving a possible mounting frame some thoughts. I'll have to gather some know-how on how to support the rear end of the motor, how to support the right driving shaft and how to counter torsion forces when accelerating or using regen. The support for the driving shaft has to be fixed with the motor/transmission assembly. Any change in the angle between the transmission and the support of the long shaft has to be avoided.

Shopping
I dared to do some more shopping: a 300€ can-usb interface from peak systems in Germany - apparently the only way to configure the Brusa components and to do some first tests (and protocol sniffing). And a 100€ 12V Bosch water pump as it's not advisable to operate the water-cooled Brusa components without any coolant circulation.
What else is missing? Some tools to crimp wires (12V and HV) and of course the car grade 12V and HV cables. I'd like to buy some HV cables but don't know how much yet. Would I just cut long pieces for first tests which I could re-use and shorten on one end for the final build?

GEVCU
The motor controller for the Brusa DMC5 is under way. It's ready to receive some status messages and log them to the console. For further development I need to do some tests with the real thing. That's why I bought the USB-CAN adapter from Peak-systems.com. I'd say it's about 20% done..


Sunday, August 4, 2013

A lot going on in parallel


Finishing the shop/garage
The old floor of the wood shed was in a very bad shape and you certainly could not place a car nor a car lift on it without arriving one floor deeper with the whole equipment. So a new floor had to be laid by the carpenter. In the area of the lift we took a 5cm thick triple layered wood panel - it's sturdy enough. The two columns of the lift were placed directly onto the 20cm thick wall of the cellar.
Car lift problems
After the car lift was mounted, it worked - but only for 1sec, then
the fault current protection (FI) cut the power - once even a bright and loud spark shot out of the control box (relais). After measuring the resistance of the control box towards ground and then the motor phases it became evident that there's a ground leakage in the direction of the motor. Opening the wire-box at the 30 year old motor quickly revealed to problem: rotten wires and isolations touching the box frame. I replaced the worst connections and fixed the isolation problem with heat shrink tube. And voila, the lift works and raises the car in half a minute :)

A first glance under the car
Once the car was safely up in the air, I was able to take a first look at what's expecting me. Not all too bad - only some rust on the frame which needs to be taken care of one day.
Interesting is though that all parts of the frame are labeled FoMoCo. After having read about Volvo using the frame of a Ford Mondeo, it quickly became evident what the meaning of that is: Ford Motor Company.
Removing the engine
Now that the shop is ready, it's about time to take out the internal combustion engine. First the air filter, the ECU, some tubes and then the wheels, the cat, some covers and the lower control arms to be able to remove the axles. Well, these control arms.. you should be able to simply pop the rubber out of their joints (near the wheel). But no greasing, no force, nothing I could figure out made this %*"*-things pop out. Not even the original Volvo removal tools (lent from a friendly garage nearby) were of any help. I even attached a 7cm thick pipe to the arm and with two persons (2x80kg) hanging at the end of the pipe we were only able to bend the pipe! So I gave up and removed the control arms on the other end - where they're attached to the frame with three rusty and very hard to remove screws. But it worked and I was able to remove the axles from the wheel disc.
Unfortunately I pulled a bit too hard on the short axle to get it out of the gear-box and broke something in it (150.- repair costs). But I'm happy to report that almost everything is disconnected from the engine now and it is supported by two screws and the coolant tubes. Almost ready to be taken out ! :)
 

Lightning strike
While I was working in the shop one night, a thunderstorm approached. As one strike was quite close (about 1km away), I quickly unplugged the laptop and stereo. A few seconds later: white flash and kaboom at the same moment. "That was close!" I thought. Well, it was: it hit our house 5m next to the shop where my wife and kids were sleeping. Result: cover cap of the heating temperature sensors flew 10m away from the house, all fault current protectors triggered, 24-port switch: gone, stereo: gone, sat system: gone, phone distribution box: fried (copper was vaporized from circuit board !). Hopefully not a bad sign but rather the provisioning of enough electricity. But: My little boy (5y) slept like a baby and did not wake up at all - astounding ! :)


Coding for GEVCU
Also a lot of coding was done for the GEVCU project (General Electric Vehicle Control Unit). Collin Kidder laid a great base in the first version of the ArduinoDue program. But the motor controller and throttle was hard coded and referred to everywhere in the code. I introduced handler classes for the CAN bus and the Due's three timers to add some abstraction and de-couple the components. Now all components/devices which are added to the GEVCU can register themselves as observers to the CAN bus or a timer and receive triggers from their respective handlers.
Also a first implementation for a CAN based throttle was added based on my previous prototyping (see previous post).
All this coding was necessary to lay a solid base where I can start implementing the motor controller for the Brusa DMC5 inverter. The GEVCU will in the end query the original ECU of the car for the requested throttle and then convert it into a torque request for the inverter. Of course it will also perform all the necessary steps to get the the devices into an operable state and also handle stuff like regen.
Jack Rickard and his evtv team are currently rigging up a VW Kübelwagen (the "Thing") which is already equipped with a DMOC inverter and a Siemens motor (from Azure Dynamics). During the EVCCON 2013 which is about to start next week, they're trying to get it running with the GEVCU (which is still in alpha phase - so not everything might work out as expected).

Pick-up of Brusa Items - or X-Mas in May

Sorry, long time no updates.. (I've been busy though)

I was able to pick-up the Brusa components in Sennwald Switzerland. During my visit I was given a thorough tour through the factory which was quite impressive.
I also started my ventures into analyzing CAN bus messages and to find out how to query the ECU for the requested throttle position so it could be used to send commands to the Brusa motor controller.

I made a short video about this for http://evtv.me . It appeared in the show of 14th of June 2013. Here you'll be able to watch it directly (first some introduction, then CAN bus analysis and at the end some impressions from the Brusa components pick-up) :
 
 
The code for the CAN-Monitor and the CAN-Throttle prototype can be found here: https://github.com/neuweiler/CANMonitor and here https://github.com/neuweiler/CANThrottle (might give an idea how to use the ArduinoDue as a CAN monitor).


next steps:
  • Refactoring of GEVCU to be more modular and support the addition of other motor controllers and throttles
  • Finish the shop and set-up the car lift
  • Start to take her apart ;)