Saturday, December 17, 2016

The Heat is on!

The Heater

Finally, I got the Eberspächer 6kW electric heater installed and up and running! It sure is a beast that needs to be tamed :) With my current water flow rate it starts boiling the water with anything higher than 2.5kW. When the blower of the car is off, bubbles even start circulating the system with 1.5kW. I equipped my GEVCU-Extension with a SW-CAN transceiver. It communicates via single wire CAN bus with the heater and controls its power output from 0 to 6000 Watts. The module of course can be configured to a desired maximum power output. It also measures the temperature of the water via a NTC resistor built-in the heater (via A0 of GEVCU transmitted via CAN to GEVCU Extension).
With the current settings, it heats with 1.5kW until the water reaches 40°C. Then it de-rates the power to 0 Watt at 70°C. This reduces the bubbling to a minimum.


I'll need to hook-up the already installed flow meter to get an idea of how many liters per minute travel through the system.

If you're interested in the code, you'll find it at GitHub. (Note that not all Eberspächer heater use SW-CAN. Many operate PWM controlled).

After 4 weeks driving at freezing temperatures (inside the car), windshields that fog up and even start to freeze over while driving, feet that won't warm up again and catching one cold after another, I'm almost looking forward to the Monday morning commute where I can hop in a pre-heated and de-iced car.

PS: Of course I didn't drive with iced/fogged windows.. I stopped and used a 12V 120 Watt heater and wasted a lot of time pointing the cheesy air flow at the windshield to get clear vision.

Unwanted Heat

Before getting the heater running I had to fight some other heat - caused by a still missing radiator for the coolant loop of the motor and controllers. I had to get to Arosa this week. It's a mountain village in the canton Graubünden, Switzerland at 1775 meter over sea level. The town at the base of the mountain (Chur) lies at 593 meters. So the task was to climb 1182 meters (3877 feet) over a distance of 35km (21 miles) with most of the height gain concentrated in the first 4km. After 120km on the high-way I had about an hour to charge with 3.7kW at Chur until I had 30Ahrs in my batteries. Then I had to take off to get to Arosa in time - or not at all. The car climbed like a champ at first. Until I hit a temperature of 133°C in the motor and the de-rating set in. Fortunately the terrain leveled off and it cooled down quickly. Just when I finished contemplating about finally installing that radiator for the coolant, I got another blow when I looked at the Amp-hours meter: 15Ah left.. for about 32km remaining. That's gonna be extremely tight - especially if we have to climb even higher. I used my "super-energy-saving" driving style and got really nervous when the Ah meter went from positive numbers to negative ones and the street just went on upwards - pretty steep. But the voltage didn't sag as I expected and it finally dawned on me that I aligned the meter to 20% SOC. So theoretically there should be another 20% reserve in the batteries to complete the trip to Arosa and not turn around with a tucked tail. Constantly checking the voltage I drove the remaining 5km and ended up with minus 3.5 Ah but still a sufficiently high voltage in the cells. Phew.. that was "interesting". But I was proud we made it - barely but we made it :)

Tuesday, December 6, 2016

Freezing over

December...

It's getting cold and although the car is running and I finally passed the re-examination of the car, the heating from the coolant of the motor and inverter is not only insufficient - it's inexistent. The coolant temperature rises to about 21°C after a 40min drive which doesn't heat the cabin at all. (So folks, it really doesn't work to heat the car with the heat of an electric drive system!) And with an outside and inside temperature of -3° to 2°C - which is not the lowest yet - my feet are cold and won't recover for 2-3 hours after these drives.
So a heating strategy must be implemented urgently. Although the approaches depicted on the right might work, I think I'll try a different approach. (note the funny coincidence: a BP logo on a battery)
I wasn't able to activate the already installed PTC heating element of the Volvo until now. The signal specs and wiring diagram pointed to a wire which regulates the power of the PTC element. I thought it was an analog or PWM signal which I tried to fake. But it didn't work. Most likely the PTC controller communicates via LIN bus messages. So it's not easy to fake it without a reference.
So maybe the best idea would be to get the already mounted but not connected Eberspächer 6kW heater working. I only have to connect hoses, a pump and an expansion tank (which I don't have yet) and find a way to read the temperature from the heater's sensor (analog signal) with GEVCU or GEVCU-Extension.

Saturday, November 26, 2016

In the Media

We caught some fame... another fellow EV enthusiast organised an interview with our local newspaper. Inspired by it, I thought "Why not try others?". So I informed all major Swiss newspapers and TV stations about the completion of the conversion. Zurich's local TV station (Tele Züri) reacted extremely quick - after 5min I got a call. The reporter showed a lot of interest at first but then the redaction was not convinced that 5 to 10min of interesting material could be cut together. Well.. although I could have talked for hours, it's not a major problem because after that, the biggest newspaper in Switzerland jumped in for a half-page interview and they even posted a video on Facebook (in swiss-german though).
For those interested, here's a translation:
Intro: "This Volvo in not only driven electrically but also home made. Michael Neuweiler fulfilled his dream with this car."
Michael: "Driving for the first time out of the garage and only hearing the crunching gravel under the tires and nothing else, this was fantastic - a really good feeling. Especially because I invested a lot of time and it worked in the end."
Reporter: "Why did you want such an electric car? Why didn't you just buy a Tesla?"
Michael: "When I started, the Tesla S was all but a rumor and it looked like it takes longer. Other electric cars were only small cars which I didn't like that much. So I thought, let's try it ourselves with the car I like."
Reporter: "When did this start and what was the catalyst for you to start the construction?"
Michael: "In 2013 I saw the film 'Who killed the electric car' and there it was explained how GM had a good car, the EV1, which was very well accepted be the customers but as soon as they were able to kill the law in California that 1% of the imported cars had to be emission free, they stopped everything, fired the employees, recalled the leased cars and scrapped them. So they scrapped 1-2 year old cars. At that time this stirred up a lot in me and in the end led to the point where I wanted to build such an electric car."
Outro: "The Volvo accelerates in approx 7 seconds from 0-100kmh. Not as quick as a Tesla Model S but sure not a lame duck."
(small correction: it's more about 10 seconds but I didn't know better at that time..)

All in all an interesting experience. Some folks address you after that. Recently my wife rented a music instrument for our son and the salesman asked her: "We do tune your piano, right?" - "Yes." - "And your husband did this electric car conversion?".
But now the thing is mostly over.. except for my father who's extremely proud of my achievement and shows the news articles to all his visitors :) But my biggest fan is still my son. In a more troubled episode with the car (more on that in another post) he surprised me with so much heartwarming compassion, it brought more than a tear to my eye :)

Article in "Affoltener Anzeiger" on 3rd of June 2016:
Half-Page article in "Blick" on 11th of June 2016:


Wednesday, August 31, 2016

Enjoying the first 4000km

The car is really nice to drive. It delights all kind of drivers: from family members, friends, our local pastor and media folks. Usually guests enjoy to ride along but when taking over the drive, that's when they really get hooked up and show their teeth in a nice EV grin.
The funniest incident was when I was driving with 30kmh through a town. Two guys sitting on their Subaru Impreza were looking at me with no particular interest while I was driving towards them. When I passed them, I could see in the rear view mirror how both bent over, eyes almost falling out and a "WTF?!?" expression on their face. Yeah, that was a silent electric car :)

But you know, there's a real downside when you convert your own car: you get hyper-sensitive to vibrations, rattles and squeaks. I always go "Whaah! What's wrong with the car?!? Is something coming apart?" until I find out that it was only irregularities in the pavement or something else rather trivial. One day I burst out in laughing about myself: I was driving in the rain and with my feet I could feel a strange rattle through the accelerator pedal - mind you, the pedal, not the floor! It stopped each time I was driving through tunnels and it resumed once I was outside. Of course again, I went "What the heck is wrong now?".. It took a while until I found out what it really was: it was the wipers blades!! I could feel the vibration of the freaking wiper rubber when it reversed - with my feet. And due to the rain sensor it was intermittent in tunnels. You'd never imagine that when you start a conversion...

But there's something that really went wrong with the car and lead to a grounding - but more about that in a later post.

Let them know

Another thing I realized: In normal traffic nobody really notices that it's an electric car. So another sticker has to go to the rear end (although I don't like stickers on cars). A friend who works at a labelling company and already made the Brusa stickers, quickly cut out various sizes of the emblem I thought would represent the idea best. I like it.

Oh yes, I owe you some technical facts:
The estimated range is around 250km (20% SOC).
Top-speed: Don't know exactly yet.. but my (not too wild) guess would be around 190-200kmh
I was planning the car to reach Kreuzlingen (100km) on one charge. When I did it the first time, I was surprised that when I arrived from the initial 90Ah still 48Ah were in the batteries. So I could drive back and even have a couple of Ah reserve. What a pleasant surprise :)
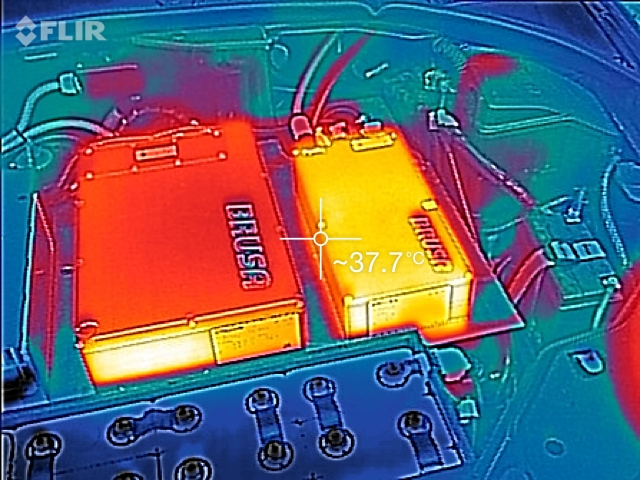
Thermal Imaging

A friend of mine got a FLIR camera and of course we took some pictures of the engine bay after an extended drive. The batteries to which we had access to, all showed a uniform heat pattern (no heat  at all).

Another round of CAN bus hacking

I still want to get seat heating/cooling, the additional heater element and de-mist operative. At last, I found another S80 owner who was willing to let me record high-speed and mid-speed bus messages at ignition, idle and revving at 1500rpm. With Collin Kidder's fantastic tool Savvycan. I was able to replay a group or single selected messages into my car's bus. Within 60min I got lucky and identified the message and bits which tell the Climate Control Module (CCM) to turn on high-power equipment. I got all the features working but unfortunately only intermittent. The Central Electronic Module (CEM) sends the "turned off" message every 100ms. So the systems switch on and off a couple of times per second. What to do? Well, I could cut the CAN wires right after the CEM and insert a filter. But as the SRS is also connected to the same bus, it might not be the best idea.  If the rare event occurs that I make an error, the airbags might not deploy when needed - or they might go off at the wrong time. Better try to locate the connection points 73/4001 and 73/4002 and only cut the line before the CCM, DIM (dash) and OBDII connector. Then I could also inject rpm information for the dash.

Maybe an even better idea is to try my luck on the high speed can bus. Right after the Engine Control Module (ECM), I could inject the rpm and operation state of the alternator. The ECU communicates over LIN bus with the alternator. Once it's ready to deliver power, the ECM tells the CEM that everything's running and which again tells the CCM that it's ok to activate high-power equipment (still with me ? :) ). Another advantage of this approach might be that the Brake Control Module thinks the motor is running and enables the supplementary power braking pump when performing an emergency brakes Although the power assisted braking works fine, rolling on asphalt you still have to push down the pedal pretty hard to get the tires skidding and ABS jumping in. I'd like this Volvo feature to be operative in my car even though it sometimes causes you and especially your passengers to be suddenly restrained by the safety belts - just because you pushed the brake pedal down a bit quicker then normal.

Media Center

Yep, Volvo no longer supports the Road Traffic Information system (RTI) I have in my 2008 car. The
latest maps are from 2013 and there won't be any newer ones.  Wow, only 5 years of support.. Because of that and because there's now an almost useless 7-inch screen now in the dashboard and because I don't particularly like the approach of using a tablet just to see the car's main parameters, I bought myself a 7-inch 1024x600 touchscreen with HDMI, VGA/RGB and even composite inputs together with a Raspberry PI. My plan is to replace the built-in screen with one of higher resolution and touch capabilities to use it
as modern navi, mediacenter and display for a selection of GEVCU gauges. Raspberry is the ideal choice as in the edition 3B it offers bluetooth, wifi, ehternet and 4 USB connectors. You connect it to a display via internal connector or HDMI. The screen is a bit too wide though.. the RTI screen casing might need some "adjustments".
At first I installed Android Marshmallow to get my favourite navigation app "Waze" running. It worked pretty much right away (without GPS signal yet). But after hours and hours I could not get the touchscreen running. I think I'd have to build a custom Android kernel with some special parameters so the eGalax Touchscreen driver can be loaded. Maybe at another time. I think the next thing to try is Raspbian and Navit. It doesn't look as cool as Waze but it might do its job as well. Another cool app might be Genius Maps.
The display I chose might be a tad too dark for car environments. Maybe the backlight can be tweaked somehow. So two things to do on this front: get touchscreen running on Android or find a decent Navi for Raspian and increase the brightness of the screen... oh and also squeeze it into the old display frame.

Friday, June 3, 2016

YEEHA !

We've made it (almost)


On May 20th at 14:30 the 2 hour long road worthiness test was conducted at the "Strassenverkehrsamt Zürich" (road traffic licensing department). Oh boy, I dreaded this moment. That's where all my efforts could have gone to waste. I feared that they'd find so many problems that I'd have to start over or give up. That's also why I involved the experts from the beginning, discussed my design and finally got a remark that if I'd follow the design, would not increase the power of the motor, not change anything in the chassis and keep all the security relevant systems running, I could get along with my conversion. But still I had so much doubt because the standards of road worthiness are extremely high in Switzerland (you folks in the US or AUS probably can't imagine). It was the sword of Damocles hanging over me during the last 3 years. But apparently all the worries were for nothing. I got a pass on all points except these three:
  1. With nobody in the car, the front weight is already at the current limit of 1180kg. With two persons in the car, it's 70kg over-weight. Darn, the conversion got 100kg heavier than I calculated.
  2. The brake disks - especially the rear ones - were rusty after 3 years not using them.
  3. The wheel alignment of the front wheels is off by 20mm on 1m - too much.
Nr. 2 and 3 are a piece of cake: Switch of regen for a while and have the alignment adjusted in a shop once the weight distribution is clear. But Nr. 1 is a bit a challenge. Either I have to move 50kg of batteries from front to back ("why only 50kg, you said 70kg ?"- yes, but mind the law of the lever) or I have to get a warranty from Volvo or a testing center that it's ok to go with a bit a higher load on the front axle.
Well, moving the batteries would be my last option because it'd mean a couple of days work again and giving up space in the trunk (which I was able to prevent until now). But there are other S80 models out there with higher load limits. One is the one with a V8 engine. It's got 120kg more on the front axle than my modell.. but except from maybe stronger springs, all the same parts are used. A confirmation from one of our two testing centers in Switzerland is just crazy costly: one charges fees starting at CHF 650.- and the other 3000.- for looking up their files and talking to the licensing department. Not an option! My hope now lies with Volvo. The homology provider of Volvo Switzerland contacted Volvo for a warranty confirmation that it'd be ok to go with 70-120kg more on the front axle. So please, please Volvo Europe/Worldwide/Sweden/Switzerland, provide me this 1-pager and your stamp on it !!!

I have to mention that the experts at the licensing department were really very friendly and supportive. I even got high praise that this was the most beautiful conversion of an electric car they've seen until now. I was dumbstruck by such a huge compliment from those who take the most detailed and professional look at the car. But albeit these issues exist, I was allowed to drive the car. I just have to fix them within a certain timeframe. 
My family accompanied me. My son (8 years) even got the afternoon off from school to be part of it. When we we were through with the test I was churning the fact of the overweight. But then suddenly it dawned on me:

I'm allowed to drive the car now!! I finally can drive the car (legally) !! I can use it for my daily commute - as of NOW !!

YEEEEEHA !! :)

Oh, we had a big family party on the way home - with monster ice-cream servings until everybody was full..  even the 4 year old gal :) When we passed a gas station I told them "Look folks, we don't have to stop there anymore." and after the next turn there was a barn with a huge photo-voltaic installation on the roof and I said "From now on, that's our gas station !".

The most touching thing about this whole story is how proud my son is of me. He keeps telling everybody, explains at school what I've done - and you see it in his eyes when he looks at me. I most likely don't get the full grasp of the impact it has on him. I'm not the type who's terribly proud of what I achieved with the conversion but what I'm really, really proud of is that I was able to show him that it's worth to stick to something. Even if it takes 3 years, you can reach a goal and change the world a bit. I have a feeling that this might be one of the biggest lessons I was able to teach him.

Wrap Up !


Let's wrap-up things, shall we?

Since the last post, I've invested a lot of time to get the car street worthy - honestly, I've had enough of tinkering and toying around. I wanted it on the street, I wanted to use it in my daily commute. In this post I'll collect all loose ends which I did not report about yet up to a stage where I dared to address the testing center and book a date for a (first) inspection.

Batteries again

Well, the front battery box was installed, the carriage for the batteries under the car as well and I even installed a crate for the batteries in the trunk. All well. But what about water, dirt, debris and salt spraying up from the street? How to protect these poor cell terminals from corrosion? Well, I had a plan from the beginning but with the help from Matthias from www.fahrzeugausbau.ch it got even better: I wanted to add a PE (Poly Ethylene) plate as main shield and just fill all gaps with construction foam - you know, this yellow sticky mass which extends by a factor of 3 or more. Matthias suggested to also use PE foam. He provided me with a load of cut-offs from his construction work and man, did it come in handy! Not only was I able to easily secure the cells in the construction, but I also filled up the major holes. So I had to use less construction foam instead . Well, I still used 4 bottles - but mainly due to my unprofessional handling.
The PE plate was also fabricated by Matthias and together we created an attachment system to hold the plate in place. The plate is 6mm thick and is able to hold of 9mm bullets. So we have enough protection from stones and debris. I wonder if Tesla's shield would hold up against a 9mm bullet :)
I know the yellow construction foam looks scary and ugly at first. But once you cut it down with a knife to the right proportions and paint it black with bitumen spray, it just vanishes. And together with the PE foam I was very cautious not to miss any spot and get all gaps filled water-tight. Well, at least spray water-tight :) (see last three pictures)

Cabling

Some impressions from my HV cabling. The first picture is probably the most noteworthy and it's also provided in a higher resolution so you get a glimpse on how the HV distribution was created. On the left side you see the red distribution bars for HV+ and on the right the black copper bars for HV-. Between the red ones you see two contactors. The left one's the secondary HV contactor. It closes after the HV contactor in the trunk did engage and the pre-charge cycle is completed. The right one will be used for fast charging via Chademo in the future. In the middle you see an HV relay which connects the green resistor for pre-charging. And on the lower right you see the shunt for coulomb metering (AH). The HV box is mapped pretty much 1:1 in the control diagram.

EHPAS Pump

This beast is a bit the bad boy in the car. In emergency mode (no CAN control messages) it's power is barely enough to keep the electro hydraulic power assisted steering running for my heavy S80 - but more annoying is the humming noise it creates. Even packed into foam rubber and covered by the front bumper, it creates too much noise for my taste. I started thinking about using the emergency brake switch connected to GEVCU to switch off the pump - so it'd be more quiet in a traffic jam. But with some music it's ok. (I'm oversensitive, I know.. it's just that the pump destroyed my fantasy of an absolutely quiet car).
But the worst thing is that although I bought this pump via an official retailer, I get absolutely no support. Not even a CAN matrix or guide.. or just even a CAN ID. Same old song from the manufacturer TRW : no support for non-OEM's... #@&##@ !!!
I could live with the first two draw-backs but the third one brings me to the point where I'd definitely not recommend this pump. Shame on you TRW - you're actually the only player in the whole game who gave absolutely no support for your 600.- pump.

GEVCU Extension

The GEVCU is a great piece of hard- and software. Especially with the WiFi chip and the web-interface Charles Galpin and I created for configuration and monitoring.. I just love it and people freak out when they see it displaying 10 values with gauges in real-time. But it has some drawbacks:
  1. Not enough digital output ports (8 are not enough for my conversion)
  2. The MOSFET's are not intended to handle the big inrush current when closing a HV contactor
  3. It lacks some inputs e.g. for single wire temperature sensors or pulsed flow meters. 
  4. It has no SW-CAN (single wire) bus to communicate with the Eberspächer heater
To resolve this issue, I created a GEVCU Extension board and software based on GEVCU's code. It's based on a 16-channel 220V relay board you can order for under $20.- on ebay, an Arduino Due and a self-made shield which holds a CAN tranciever, a SW-CAN transceiver and an EEPROM to store config values like GEVCU.
GEVCU communicates via CAN bus with the extension board and tells it to engage the pre-charge relay, the contactors, start the heater or coolant pump and fan. And in return for that, the GEVCU extension board reads temperature and water flow measurements and reports them back to GEVCU via CAN also. There are also some safety features built in so should the two boards get out-of-synch, the HV contactors will be released or not closed at all (state machine on both boards).
I also created one last video before hitting the road from some old dusty recordings.

Charger connector


The only place the connector for charging should go is of course where you used to hook up the gas nozzle. A friendly fellow by the name of Andre Te Sla (no joke !) runs the company www.electroscout.ch. He was able to provide me with a receptacle which fit in perfectly and also a 1-phase charging cable that I can hook up to the car and a red CEE-16 plug. I created myself some adapters for CEE-32 and Swiss household sockets. Works like a charm. All that's missing, is the 880 Ohm resistor between ground and a 12V PWM signal provided by official charging stations so the signal goes down to 6V and the charging process starts. But until now I was happy with dumb 230V sockets.